
A stairway gallery wall presents unique spatial challenges that differentiate it from standard wall displays. The ascending architecture creates visual weight distribution issues, while varying sight lines complicate traditional hanging methods.
Professional designers recognize that diagonal compositions require modified spacing calculations and strategic anchor points to achieve visual cohesion.
Without proper planning techniques, even high-quality artwork can appear haphazard against the staircase’s linear progression.
Seven fundamental principles govern successful stairway installations, transforming these architectural obstacles into compelling design opportunities.
Also read this: Indoor-Outdoor Home Decor Ideas
Start With Paper Templates to Plan Your Layout
The most effective approach to achieving a balanced stairway gallery wall begins with creating precise paper templates that mirror each frame’s dimensions. Trace each frame’s outline onto kraft paper or poster board, ensuring accurate measurement through careful cutting along marked lines.

Secure templates to the wall using painter’s tape, facilitating experimentation with multiple configurations without creating unnecessary holes. Employ a level during template arrangement to maintain consistent spacing—typically 2-3 inches between frames—while achieving proper alignment.
Document the final layout planning arrangement through photography, providing essential reference material for seamless execution during the actual installation process.
Also read this: 10 Best Vertical Storage Ideas for Small Bathrooms
Good design is obvious. Great design is transparent. – Joe Sparano
Measure and Mark Your Stairway Wall Space
Before placing any artwork, homeowners must establish a central reference line that runs parallel to the staircase angle, serving as the primary anchor point for the entire gallery arrangement.
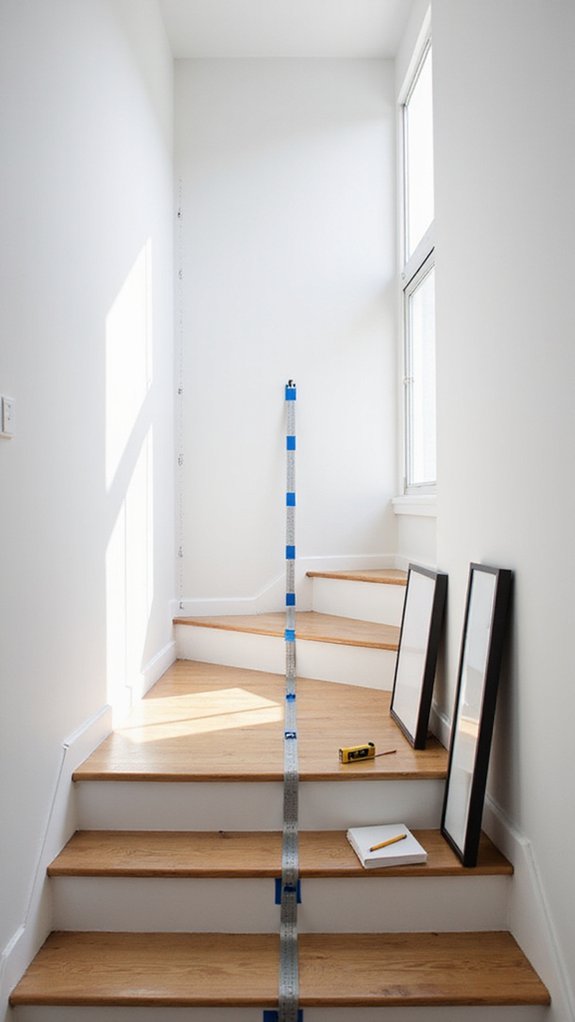
This centerline typically follows the handrail’s trajectory or maintains a consistent distance from the stair treads, creating visual continuity throughout the ascending display.
Accurate measurement of the total wall dimensions from the lowest accessible point to the upper landing determines the maximum footprint available for the gallery configuration.
Find Your Centerline Reference
Creating an effective stairway gallery wall begins with establishing a precise centerline reference that serves as the foundational anchor for the entire composition.
Identifying the central point along the stairway wall requires alignment with the staircase’s midpoint or a prominent visual element. Mark this position clearly with a pencil to establish the primary reference point.
Using painter’s tape, create a horizontal baseline at the standard viewing height of 57 inches from the floor. This marking system provides essential spatial guidelines for the layout.
The centerline reference ensures symmetrical distribution of frames while maintaining visual balance throughout the ascending wall space.
Calculate Available Wall Space
Accurate measurements form the foundation of any successful stairway gallery wall installation. Using a measuring tape, determine the total length and height of the designated wall space along the staircase.
A step ladder guarantees precise dimensions for elevated sections that are difficult to reach from ground level.
Mark the boundaries with painter’s tape to visualize the complete layout before finalizing frame placement. Leave 2-3 inches between wall edges and the gallery perimeter to maintain visual balance.
Record all dimensions carefully and double-check measurements before purchasing frames or creating placement marks, making certain the final arrangement fits perfectly within the calculated parameters.
Create Consistent Spacing Between Frames
Establishing uniform spacing between frames requires precise measurement techniques to achieve professional-looking results on stairway walls.

Painter’s tape serves as an essential tool for marking exact intervals and maintaining consistent gaps throughout the vertical arrangement.
Proper spacing creates visual rhythm that guides the eye smoothly along the staircase while preventing the gallery from appearing cluttered or unbalanced.
Measure Gaps Precisely
| Measurement Tool | Precision Level |
|---|---|
| Ruler | High accuracy |
| Tape measure | Flexible reach |
| Painter’s tape | Visual guide |
| Level | Alignment check |
Strategic placement begins with outermost frames, working inward to maintain consistent spacing intervals across the entire arrangement.
Use Painter’s Tape
Before committing to permanent nail holes, painter’s tape serves as an invaluable positioning tool that enables precise frame spacing across stairway walls.
Apply tape strips to mark 2-3 inch intervals between frames, maintaining consistent gaps throughout the gallery wall layout.
Create horizontal and vertical guidelines using tape to align multiple frames along grid patterns or uniform heights. Tape can temporarily secure paper templates in position, allowing spatial adjustments before final placement.
This methodical approach transforms challenging stairway installations into controlled arrangements, where each frame’s placement contributes to cohesive visual flow along ascending or descending wall surfaces.
Maintain Visual Balance
Achieving ideal balance requires systematic measurements and strategic positioning:
- Mark equal distances using painter’s tape before hanging any frames to ensure uniform spacing throughout the gallery arrangement.
- Measure edge-to-edge between adjacent frames, adjusting placement to maintain consistent gaps across the entire wall composition.
- Work from central points outward when arranging multiple frames, preserving visual equilibrium through calculated positioning.
Regular assessment from various viewing angles confirms that spacing appears harmonious and professionally balanced across the stairway’s ascending plane.
Mix Frame Sizes and Styles for Visual Interest
The strategic combination of diverse frame dimensions and finishes transforms a stairway gallery wall from a static display into a visually compelling composition. Incorporating 8×10, 11×14, and 5×7 frames creates dimensional hierarchy while establishing focal points throughout the creative layout.

A variety of styles—vintage gold, sleek black, and natural wood finishes generates textural contrast and curated sophistication. Distributing larger frames evenly prevents visual clustering, while alternating portrait and landscape orientations enhances directional flow.
This deliberate mix frame sizes approach ensures the gallery wall maintains cohesive balance without sacrificing visual interest, resulting in a dynamic arrangement that guides viewers naturally along the stairway’s ascent.
Use a Level Tool for Straight Alignment
Proper alignment serves as the foundation for any successful stairway gallery wall, requiring precise measurement tools to achieve professional-grade results. A level tool ensures straight horizontal lines across multiple frames, preventing crooked installations that compromise visual appeal.

Precise measurement tools and proper alignment techniques form the cornerstone of professional-quality stairway gallery wall installations.
Essential level practices for stairway gallery walls:
- Calibrate accuracy – Verify level tool precision before marking wall positions to maintain consistent alignment throughout the installation process.
- Reference frame positioning – Place level along top or bottom edges of frames to create uniform horizontal lines across the entire display.
- Progressive verification – Check alignment after hanging each piece to prevent cumulative errors that require costly adjustments.
Consistent level usage delivers professional-grade straight alignment results.
Begin Hanging From a Central Reference Point
Establishing a central reference point creates the foundational anchor that governs spatial relationships throughout the entire stairway gallery installation. Measure precisely 57 inches from the floor to establish this critical baseline along the staircase wall, aligning with ideal viewing height.

Position the most prominent frame at this central location to serve as the visual cornerstone. Deploy a laser level to verify perfect horizontal alignment before proceeding. This methodical approach ensures symmetry and balanced proportions as additional pieces radiate outward.
Hang subsequent frames while maintaining consistent spacing intervals, allowing the central reference point to dictate cohesive visual flow throughout the ascending display.
Step Back Frequently to Assess Balance

- Assess layout from stairway’s midpoint to gauge overall composition.
- Monitor spacing consistency between adjacent frames during installation.
- Execute final viewing from afar to confirm professional cohesiveness.
This methodical approach guarantees polished results.
Final Verdict
Successful stairway gallery installations require methodical execution of spatial planning principles. Proper template preparation, precise measurements, and consistent spacing intervals establish foundational structure.
Strategic frame placement utilizing varied proportions creates dynamic visual hierarchy while maintaining architectural harmony.
Level alignment and central reference positioning ensure professional-grade installation standards. Continuous assessment through stepped observation enables real-time adjustments for desirable compositional balance.
These systematic approaches transform challenging stairway surfaces into sophisticated, cohesive gallery presentations that enhance vertical circulation spaces.
FAQs
Recommended Products

Kraft Paper Roll 17.5 inch x 100 feet for Gallery Wall Planning Template
Kraft paper roll - Gallery wall template paper
VIEW LATEST PRICE
T-Square Ruler 24 Inch Aluminum Alloy Metal Measuring Tool
T-square ruler - Wall layout tool
VIEW LATEST PRICE
Americanflat Gallery Wall Frame Set with Hanging Template - Mixed Metal Finishes
Metal picture frames set - Mixed finish frames
VIEW LATEST PRICE

